
Garburator Not Working? Safe Checks, Repair or Replace, and What Burnaby Wants Kept Out of It
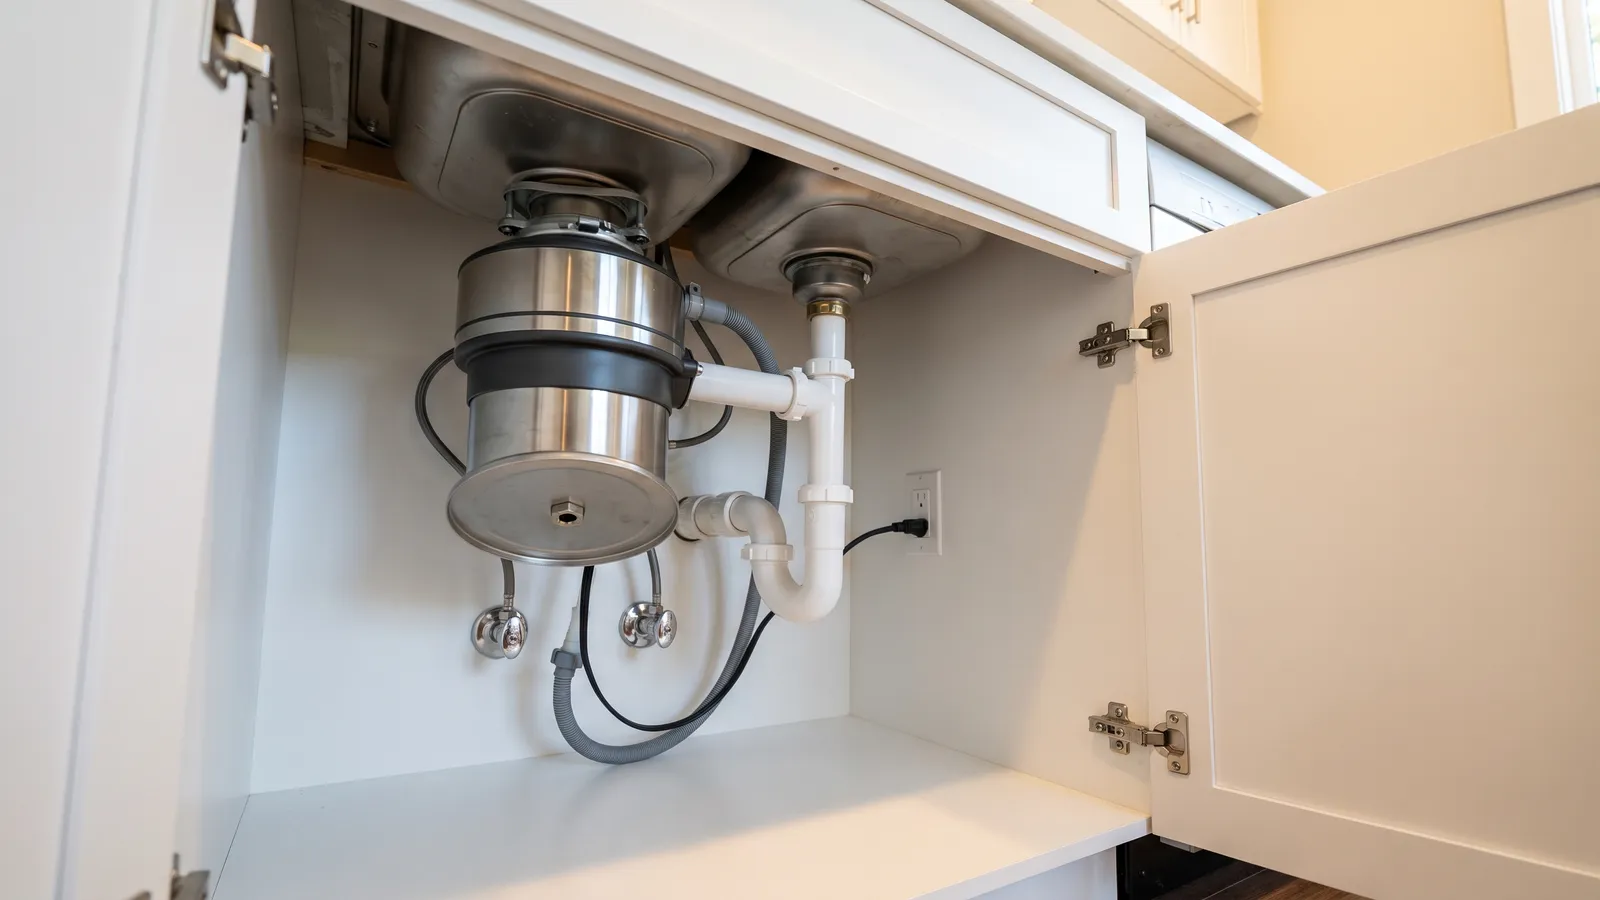
The short version — A garburator that hums but will not grind is usually jammed. On InSinkErator units you switch it off, turn the rotor from underneath with the wrench or a 1/4-inch Allen key in the hole at the centre of the bottom, lift any object out with tongs, then press the red reset button on the bottom. If it is silent, that reset button may have tripped; press it gently, and if it will not stay up, wait about ten minutes and try again. Other brands differ, so check the manual for yours. Never put a hand inside the unit. Metro Vancouver advises avoiding garburators and composting instead, and in Burnaby small amounts of absorbed cooking oil and grease go in the green bin, not down the sink.
A garburator that quits usually does it mid-dinner, with a sink full of water and scraps sitting on top. Most of the time the cause is a jam or a tripped reset button, and you can deal with both safely in a few minutes. When it's leaking or the motor is finished, it's a different job, and knowing which one you have saves you either a service call or a wet cabinet.
Before anything else: switch it off and keep your hands out of it. InSinkErator's own support guide is blunt about it: "Do not place your hand in the garbage disposal at any time."
1. What the symptom is telling you, and what you can safely do
It hums but doesn't grind
That hum is the motor trying to turn a rotor that's stuck. A bit of bone, a fruit pit, a bottle cap or a spoon is the usual culprit. These are InSinkErator's jam steps for its own units. Other brands work on the same idea but the tool, the socket and the reset button can differ, so check the model label and manual for yours:
- Make sure the switch is off. If the sink is full, let it drain or bail it out with a pot.
- Under the sink, find the hole dead centre on the bottom of the unit, facing the floor. InSinkErator units come with a small wrench for it, and the company says a standard 1/4-inch Allen key works too.
- Work the key back and forth until it turns freely. That frees the rotor from below, well away from the grinding chamber.
- Reach in with tongs, not your hand, and lift out whatever caused it.
- Press the red reset button on the bottom, run cold water, and switch it back on.
If it still hums without grinding, give the motor about ten minutes to cool before you try again; InSinkErator says some of its models need up to 20. If it jams again straight away, stop there.
It's completely silent
Check the overload protector first. InSinkErator describes it as a red square button on the bottom of the unit, facing the floor. When it has tripped, the button sits about a quarter of an inch lower than normal. Press it gently. If it won't stay up, the manufacturer's advice is to wait ten minutes and try again.
If the button holds and the unit is still dead, the problem may be the switch, the outlet, the breaker or the wiring. A garburator is an electrical appliance, and that side of it is a licensed electrician's job. Don't open the electrical cover on the unit or take the wall switch apart.
It drains slowly or backs up
InSinkErator's clog guide starts with the power: turn the unit off and disconnect the power supply. In practice that means unplugging it if it plugs into an outlet under the sink, or switching off its breaker if it's wired in. Then it suggests scrubbing the underside of the rubber baffle and the upper lip of the grinding chamber with a scouring pad. Hold the pad with tongs or on a brush; your fingers never go into the chamber. Finish by flushing with warm water and a quarter cup of baking soda. A plunger over the opening, pressed down gently and pulled up sharply a few times, is also on their list.
Leave the chemical drain cleaner on the shelf. InSinkErator's operating instructions for its commercial disposers list drain cleaner among the things never to put in one. If plunging doesn't clear it, the blockage is probably further down the line, and that's a drain cleaning job.
It smells
Smell usually comes from scraps stuck under the baffle and on the chamber walls, and the same scouring-pad clean deals with most of it. InSinkErator's commercial operating instructions also say not to stop the unit with food still in it, and to let the water run until it has cleared; the maker says that helps keep a disposer odour-free and avoids drain stoppages. The same habit makes sense at home.
It's leaking
Switch it off, put a bucket under it, and find where the water is coming from. InSinkErator's leak guide starts with two places: the top, where the unit mounts to the sink, and the discharge, where it joins the drain pipe. Those are connections. A leak from anywhere else, or one you can't pin down, is where to stop and call.
2. Repair or replace: how a plumber decides
A jam, a tripped reset, a clog or a loose connection are repairs. None of them needs a new unit, and after the steps above you may have done the repair yourself.
Replacement comes into it when the appliance has given up: the motor won't turn even after the jam is cleared and the reset holds, it keeps jamming or tripping on normal use, or the water is coming from the unit rather than a connection. That's the question a plumber is answering when they look at it. Is this a connection or a blockage that can be fixed, or has the unit reached the end? Here's a garburator replacement we did in Burnaby, where the customer's old unit had broken.
What drives the cost of a replacement is mostly what's around the unit:
- The unit you choose. Motor size and build vary between models.
- The electrical side. A unit that plugs into an existing outlet under the sink is simpler than one that needs new wiring, and new wiring means an electrician.
- The plumbing around it. Whether the new unit lines up with your existing trap and dishwasher connection, or the drain under the sink has to be reworked to suit it.
- Access. A tight cabinet or a corroded old mount takes longer.
If you're weighing up a replacement, it's also the moment to ask whether you want a garburator at all.
3. What should go down it, according to Metro Vancouver and Burnaby
Metro Vancouver runs the regional sewers and treatment plants, and its guide to what happens to our wastewater puts it plainly: "Avoid using garburators – composting is a better alternative and puts less strain on our wastewater treatment system." The same guide says to wipe up cooking oil and grease with a paper towel and put it in your organics bin.
Food scraps have been banned from disposal as garbage across Metro Vancouver since January 2015, and the region's answer is the green bin. The City of Burnaby is specific about grease: small amounts of cooking oil and grease can go in your green bin once paper towel or newspaper has soaked them up, and larger volumes can be dropped off at the Burnaby Eco-Centre at 4855 Still Creek Drive.
InSinkErator's operating instructions for its commercial disposers have their own list of what never goes in one. It includes grease, oil, syrup, clam or oyster shells, large bones, glass, china, metal, plastic wrap, drain cleaner and extremely hot water. They also say to have the water running before you feed anything in, and not to overload it.
So if you keep a garburator, use it to rinse the last bits off a plate. Your scraps belong in the green bin, and fat and oil never go down the sink, garburator or not.
4. Taking it out altogether
If you've switched to the green bin, your garburator may barely get used. When a unit like that fails, removing it instead of replacing it is a good option, and given what Metro Vancouver advises, it's one worth putting on the table.
Removing a garburator isn't just unbolting it. The sink needs a proper strainer where the unit was mounted, and the drain underneath has to be re-piped to a trap that works without it. If your dishwasher drains through the garburator, it needs a new connection too. And the outlet or switch that fed the unit is a job for an electrician.
Here's one of ours: a garburator removed and the kitchen sink re-piped in Burnaby. If you're planning a bigger kitchen update, do it at the same time, while the cabinet is empty and the drain is open anyway. Our repiping and renovations service handles that work.
5. When to stop and call
Stop troubleshooting and leave the unit off if:
- Water is coming from the garburator itself, or from somewhere under the sink you can't identify.
- The cabinet floor is soft, stained or swollen, or it smells musty under there. That points to a leak that's been going on a while; our post on the signs of a hidden water leak covers what to look for.
- It jams again straight after you've cleared it, or the reset keeps tripping.
- You smell burning, see scorch marks, or the switch or outlet feels warm. Leave it off and call an electrician.
- The sink backs up and plunging doesn't clear it.
If water is actively coming out and you can't stop it, close the shut-off valves under the sink and see our emergency plumbing page.
The short version
A humming garburator is usually jammed. On an InSinkErator: power off, turn the key in the hole at the bottom centre, lift the object out with tongs, press the red reset; for other brands, check the manual. A silent one has often tripped its reset button. Leaks, repeat jams and anything electrical are where the DIY stops. If yours has reached the end, decide between replacing and removing it, since Metro Vancouver recommends composting over garburators. To have it looked at, see our faucets and fixtures service.
Frequently asked questions
Why does my garburator hum but not turn?
A garburator that hums without grinding is usually jammed, with something stuck against the rotor. On InSinkErator units the steps are to switch it off, turn the rotor back and forth with the wrench or a 1/4-inch Allen key in the hole at the centre of the bottom of the unit, lift the object out with tongs, and press the red reset button. Other brands differ, so check the manual for yours. Never put your hand inside the unit.
Where is the reset button on a garburator?
On InSinkErator garburators the reset button is a red square button on the bottom of the unit, facing the floor. If it has tripped, it sits about a quarter of an inch lower than normal. Press it gently, and if it will not stay up, wait ten minutes and try again.
Does Metro Vancouver recommend garburators?
No. Metro Vancouver advises residents to avoid using garburators, saying composting is a better alternative and puts less strain on the regional wastewater treatment system. Food scraps have been banned from the garbage in Metro Vancouver since January 2015 and go in the green bin.
Can I put grease down my garburator in Burnaby?
No. Metro Vancouver says to wipe up cooking oil and grease with a paper towel and put it in your organics bin, and the City of Burnaby says small amounts can go in the green bin once absorbed by paper towel or newspaper, with larger volumes dropped off at the Burnaby Eco-Centre.
Sources & further reading
- InSinkErator: Fixing a Jammed Garbage Disposal
- InSinkErator: Resetting a Garbage Disposal
- InSinkErator: Fixing a Clogged Garbage Disposal
- InSinkErator: Garbage Disposal Leaking
- InSinkErator: Commercial (Foodservice) Disposer Operating Instructions (13354 Rev. C)
- Metro Vancouver: Wastewater, from your home to treatment and beyond
- Metro Vancouver: About Food Scraps Recycling
- City of Burnaby: Food Scraps & Yard Waste
Rebate amounts, fees, and code requirements change over time and by municipality. Figures here were verified against the official sources above as of October 1, 2026; always confirm current details with the program or your local authority before making decisions.